
Powder coating cracking during impact tests? A combination of dual-layer coating and slight oven temperature…
Paint Preparation Before Spraying
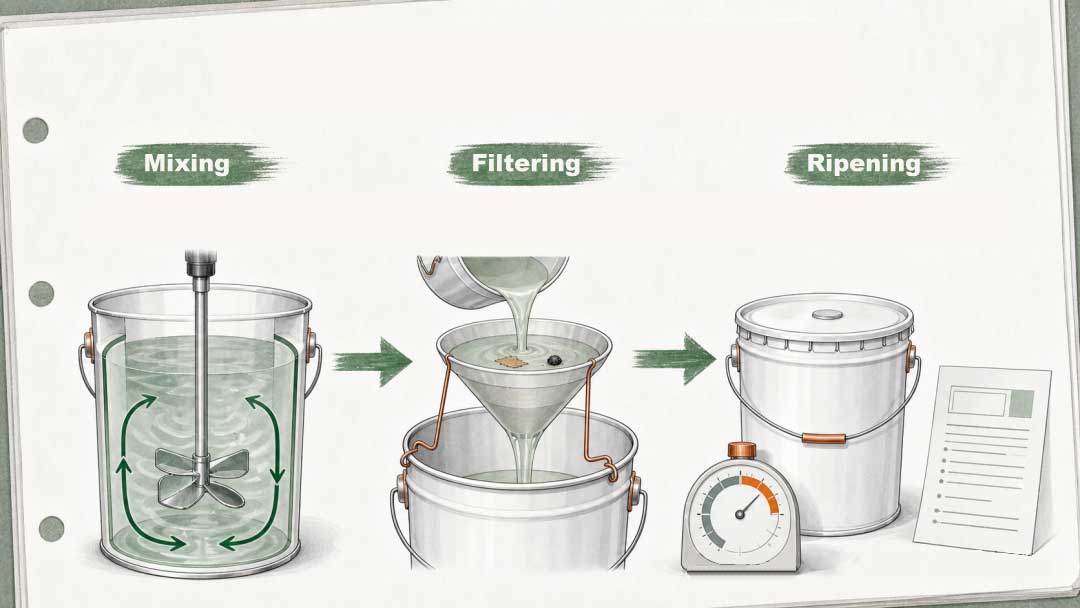
After opening the paint container: stirring, filtering, and induction – three steps addressing three distinct issues.
Once the lid is open, first inspect the rim and surface. Only after assessing the state of the liquid surface should the mixer be inserted. A filter screen and an empty container should already be set up nearby; for two-component materials, the time is recorded immediately upon mixing.
These three actions follow closely upon one another, each handling a specific phase: stirring re-mixes settled components into a uniform blend, while filtering catches foreign matter and large particles. Induction is a more specific step, required only when explicitly specified by the product instructions.
The initial state can only be seen once
Once the mixer descends, surface skin, sediment at the bottom, and any localized gel lumps are churned into the liquid. Any subsequent attempt to verify the condition at the time of opening relies solely on photographs and records made at that moment.
After opening, first verify the product name, components, batch number, packaging integrity, and shelf life. Then, inspect the liquid surface for skinning, foreign matter, abnormal separation, or gelation. If it is necessary to probe the bottom, use a clean tool compatible with the material to determine whether the sediment is soft and easily re-dispersed or has formed a hard, dry, solid mass.
For coatings containing pigments and fillers, some sedimentation at the bottom after storage is not uncommon. As long as the sediment can be re-mixed according to product specifications, the material remains viable for further evaluation. However, if you observe extensive skinning, significant gelation, stringy gel lumps, a hard dry bottom layer, or excessive coarse particles, stop immediately and retain photographs, the batch number, and a sample. Forcing these lumps to break up destroys the evidence of the material’s original state, making it difficult for the supplier to diagnose what happened to that specific batch.
Stirring aims to restore consistency throughout the container
In a container of paint that appears undisturbed, the distribution of pigments, fillers, and the liquid phase may already vary between the top, middle, and bottom. The goal of stirring is to return the re-mixable components to a uniform state.
Determining when the material is ready for the next step requires more than just tracking the mixing duration. Only proceed to the next step if there are no soft sediments left to scrape from the bottom, any material adhering to the walls has been incorporated back into the paint, the color and consistency are uniform from top to bottom, and no suspicious streaks or lumps are visible. Select the appropriate mixing blade, speed, and duration based on the package size, material viscosity, and product specifications. Minimize air entrapment and splashing during mixing, and prevent water, old paint, or cleaning agents on the tools from contaminating the new container.
For two-component materials, pay close attention to the order of addition. If the product requires pre-mixing the base component, blend it thoroughly first, then add the curing agent according to the specified mass or volume ratio, and finally mix the material from the sides, bottom, and center until uniform. Accurate weighing of components A and B ensures the correct mixing ratio but does not guarantee that the entire container is thoroughly mixed.
Soft sediment can often be re-incorporated, but material that has already gelled will not recover with further mixing. The same applies to hard, dry deposits at the bottom, persistent coarse particles, and recurring large lumps of skin. In such cases, isolate the material, retain a sample, and handle it according to product documentation and supplier recommendations.
Filtration catches particles but cannot re-disperse the material
Passing the coating through a filter screen before it enters the feed tank or equipment traps skin fragments, packaging debris, foreign objects introduced on-site, and particles larger than the mesh openings. This protects nozzles and pumps while reducing surface defects caused by foreign matter.
Filter screens respond only to particle size. Passing the material through the screen once will not fix issues such as pigment agglomeration, poor dispersion, or a lack of uniformity between the top and bottom of the container. If a large amount of residue quickly accumulates on the screen, save the residue and review the photos taken upon opening the container and the mixing process. The fact that material is filtered out simply means it was trapped by the screen; this alone is not grounds for approving the entire batch of material.
If the filter screen is too fine, the immediate issues encountered on-site are often screen clogging, slowed material feed, or the pump failing to draw material. Products containing flake pigments, glass flakes, fibers, or special fillers carry an additional risk: essential formulation components may be filtered out. Some application instructions for glass-flake products explicitly require the removal of equipment filters.
When selecting mesh fineness, consult the product application guidelines, spraying equipment specifications, and nozzle requirements simultaneously. Records should specify the nominal mesh count or aperture size, the installation location, and what material was retained on the screen. Since mesh rating conventions can vary, simply noting a mesh number may not allow for the exact identification of the screen type used later.
Induction (or “sweat-in”) time is the period required for a specific system to reach an application-ready state
Some two-component coatings require a resting period after components A and B are thoroughly mixed before application can begin. During this waiting period, the resin and curing agent begin to react, and the material’s viscosity, compatibility, and application characteristics gradually shift into the product’s specified usage window. At this stage, the material remains in the container and is far from achieving a fully cured film.
Decisions regarding whether induction is required, the duration of the wait, and the material temperature used for calculations must be based on specific product documentation. Some two-component products explicitly mandate a waiting period, while others state that no induction is necessary. Arbitrarily adding a “safety margin” wastes part of the pot life; conversely, starting application prematurely when induction is required may result in application properties and film formation that deviate from the manufacturer’s validated conditions.
The pot life clock typically starts ticking as soon as the two components are mixed; one cannot simply restart the timer after the induction period ends. During the waiting period, keep the container covered or maintained as specified to prevent contamination by foreign objects and minimize unnecessary solvent loss. Since temperature affects reaction rates, both induction time and pot life must be evaluated in conjunction with the corresponding temperatures listed in the product data.
Record mixing ratio, mixing quality, induction time, and pot life in four separate columns
It is best to list these four items separately in your records. If they are crowded into a single column, it becomes difficult to pinpoint the cause of any issues—whether it was an error in weighing, inadequate mixing, or exceeding the time limit.
For the mixing ratio, specify the quantities of components A and B, and indicate whether the ratio is based on mass or volume. Volume ratios cannot be used directly for weighing, nor can the size of the packaging container serve as a substitute for actual measurement.
“Uniform mixing” refers to whether the two components have achieved consistency throughout the entire container. Factors to consider include pre-mixing, the order of addition, the coverage area of the mixer, and whether the bottom and sides of the container have been thoroughly addressed.
Induction time (maturation time) should only be recorded if the product specifications require it; the actual material temperature, time of mixing completion, and the allowable usage window must also be noted. If the product does not require this step, recording “no induction required” is clearer than leaving the field blank.
The “pot life” (usable period) entry should indicate the latest time the mixed material can be used. Material temperature and the volume of a single batch affect this duration. Once the product’s specified limit is exceeded, the material must be disposed of according to site waste management protocols; simply adding thinner or fresh material to restart the clock is not permitted, even if the paint in the container remains fluid.
A site record should capture at least the following information:
Records need not be lengthy, but they must allow for the reconstruction of the material’s history from opening to application:
- Product name, names of components A and B, and their respective batch numbers and packaging specifications;
- Time of opening, material temperature, and ambient temperature (plus humidity and application location, if necessary);
- Observations upon opening, including the liquid surface, container bottom, sedimentation, skinning, gelation, coarse particles, and foreign matter;
- Specified mixing ratio and measurement method, plus actual quantities of components A and B used;
- Name, batch number, and actual quantity of thinner added (or a note stating none was added);
- Start and end times for pre-mixing the base component and for the combined mixing process, as well as the state of the mixture after blending;
- Whether induction is required, along with the induction start time and the allowable usage window;
- Application start time, pause times, remaining quantity, and the pot life expiration time;
- Filter specifications, installation location, photos of residues, and the outcome of any handling of anomalies.
For multi-shift operations, use a consistent time format, and ensure the material container, record sheet, and application area all share the same identification number. This allows the next shift to see at a glance when the material was mixed, when application began, and how much usable time remains.
Write the mixing completion time, allowable usage window, and pot life expiration time on the side of the container as well as in the record sheet. Whether the spraying process is paused mid-operation or handed over to the next shift, there is no need to rely on memory or calculations to reconstruct the situation on-site.

Find More
Comments (0)